
Just to state what is (hopefully) obvious: your computer hard drive where you just organized all your digital pictures is NOT a backup. That’s the home of your originals. A backup must be a second (or third or fourth) copy of your files. By the way, Facebook is NOT a backup! (I’ll talk more about why in a minute.)
So I scolded you enough in the last post about backing up your precious photo collection. By now you should’ve done your physical backups, but THE CLOUD is an incredible off-site solution you also need to use for archiving. Note I said also, meaning “in addition to,” so if you haven’t done your physical backups yet, quit jumping ahead. Do those right now and then come back here to zap your pics to the heavens!
THE MAGICAL CLOUD
The “cloud” is a magical place that’s not really in the sky. But if it makes you feel better envisioning it there instead of in a bunch of boring server rooms across the country/globe, go for it. This online-only option for storage is remote (not local to your own home/office/computer) and redundant (assuming you’ve picked a reputable cloud service). It’s secure and private (again, assumptions abound but precautions can be taken if concerned).
 The absolute best part about anything stored “in the cloud” is that it’s accessible from anywhere. Well, technically anywhere that can get an internet signal. And since that ranges from airplanes and cruise ships these days, it’s pretty safe to say that “pert near” anywhere counts as close enough. Of course, this high-tech option has a major problem if there’s a power outage or internet service is down. You can’t get at your photos like you could if they were printed out and put in 3-ring-binder-type photo albums on your bookshelf.
However, your photos in the cloud will NOT end up waterlogged from the fire department trying to save your house from burning down (or completely turned into ash dust if they were not successful in the least). Unlike your physical backups, your cloud-backed-up photos cannot be wiped out by tornados, hurricanes, earthquakes, floods and other examples of Mother Nature’s wrath. This is a major advantage of cloud archival storage.
CLOUD CONFUSION
First of all, let me state what should also be obvious…Facebook (or Instagram) is NOT a backup. While it may be “in the cloud,” these social media communities do NOT save your photos at full resolution for easy download at your convenience. That’s how they lose out on being considered a backup resource. Can you download your Facebook photos, posts & entire history? Youbetcha. And you should at least once a year just for the fun of it. Go here to learn where the data is saved, what is saved and how it can be downloaded to your computer as an archive.
 Now that you made all your physical backups, you’re probably feeling pretty archive-savvy. Hopefully I don’t freak you out by mentioning the word “cloud” when it comes to backups! Because that magical “place” should definitely be part of your archive strategy. The trick is that it can be a bit overwhelming with all the options out there. The hardest part is trying to figure out which one is right for your situation and making sure everything is set up correctly to do what it should. After that, it’s pretty much on auto-pilot. Get, it clouds, plane…you with me?
“The Cloud” is not really a white puffy shape holding your data, of course. But it is sort of “out there” or “up there.” That’s why it is an excellent segment of your archive strategy — because your physical copies can be destroyed/damaged/stolen/lost/etc much easier than you may realize. Having a whole drawer full of DVD backups won’t save your photos if your whole house goes up in flames. Or gets soaked by the fire department’s hoses trying to put out the fire. Or if a pipe bursts and soaks through the ceiling right onto your computer and where you store all your external hard drives.
Remember how I said those physical backups needed to at least have one copy in an ALTERNATE LOCATION. This is why. No one knows when something bad is going to happen so being prepared in advance is the only way to insure it doesn’t destroy your photo collection too.
Cloud storage is simply the ability to save files on servers in remote locations that can be accessed via the internet from any enabled computer or device. What makes it so convenient is that it’s always there. No need to carry around your external hard drive or pile of DVD cases to have access to all your images at any time in any place.
March 31st is known as WORLD BACKUP DAY! It’s a day dedicated to reminding everyone the importance of backing up their priceless data, primarily photos in our case! Their warning “Don’t be an April fool!” is an annual reminder to do what should be done regularly, but sadly, is not. Learn more about backups and take the pledge with me on this site.
According to Backblaze, 30% of people have NEVER backed up their files. Yet 29% of disasters are caused by accident, 113 phones are lost or stolen every minute, and 1 in 10 computers are infected with viruses each month (sources per World Backup Day website).
For one thing, if you have physical backups stored in the same room/home as your main computer, and something bad happens to your property, BOTH are gone. Whether that be fire, flood, tornado, hurricane, theft, power surge, or other natural or manmade disaster, the point is that your originals (on the computer) AND your copies (on DVDs or an external hard drives) are likely destroyed as well. Double (or triple) bummer.
 Sure, you can send the destroyed devices off to Drive Savers, who work miracles on rescuing data (& I highly recommend their expertise if you are up a creek without a paddle), but that involves risk and cost without a guarantee. Are you willing to risk all that just because you’re too lazy to follow a simple archival strategy? Click the banner link to learn more about what they can do and save 10% on any rescues you may need done.
 If you follow my 3-2-1 BACK-UP BLAST-OFF plan, you need 3 copies, in 2 different media formats with at least one of those off-site — as a minimum! 3: Technically, the term “copies” would mean 3 versions IN ADDITION TO the original. But I think you are fine having at least a total of 3 — originals plus 2 copies. 2: To get two different media types, you need to mix up your storage choices. In other words, both copies should not be on external hard drives (EHD) due to high failure rates. Instead, you should have one EHD and one set of DVDs or USB flash drives. 1: Now make one of those copies reside off-site in a location far enough away from your primary location that a tornado, hurricane or flood would not ever affect both places at the same time.
I’m sure you’ve heard the Benjamin Franklin quote:
“In this world nothing can be said to be certain, except death and taxes.”
Well, I’d like to amend that by adding “data loss” to his list. It’s almost a given that each of us will have at least one data loss (likely due to technological hardware or software failure) in our lifetimes. The only questionable part is when, because you never know when your time has come. So being properly prepared is the only way to survive this calamity.
Everyone asks…can cloud storage count as off-site? Well, technically yes! It is definitely “off-site” and it’s in another media type so that checks off two of the boxes on our 3-2-1 Back-up Blast-off plan! Some experts warn against cloud storage due to its “stormy” issues of security and privacy. Others point out that some cloud companies have come — and gone due to bankruptcy, taking with them your data in some cases.
In my personal (and professional) opinion, the cloud offers an easy, economical, nearly effortless solution to not only backup but also to sync continual changes to an alternate, off-site option that I can access from almost any digital device via the internet. That’s worth it’s weight in gold to me! I can worry less about data security/privacy problems, although some celebrities with photos of themselves in compromising situations would beg to differ. If you don’t have anything to hide, or I should say, if you aren’t afraid to show or share everything you put in the cloud, then no worries.
However, there are plenty of ways you can protect your data in the cloud, such as passwords, encryption, etc. I won’t go into detail in this post but you can search online for assistance in this area.
My number one rule regarding the cloud as a photo backup strategy is that FACEBOOK IS NOT A PHOTO BACKUP SOLUTION! Neither is INSTAGRAM! Gasp! I know many of you are either freaking out or scratching your head right now. Allow me to elaborate. Facebook and Instagram are social media SHARING sites. Facebook currently stores more than 250 BILLION images. And, more than 100 MILLION photos are uploaded to Facebook each day. Wow-za!
If you want to see a cool visual representation of what happens online in just one second, visit this cool webpage for “live” data updates for Instagram, Facebook, YouTube, Google and more.

SIDE NOTE: Many of us prefer to have our photos look their very best on Facebook. We’re not satisfied with the extreme compression and down-sampling Facebook has to do to hold all the photos of you and your friends out on the town, cats doing crazy cool things, and selfies, of course! If you are a professional photographer (or want to play one on the internet), you’ll want to follow these specific instructions for how to get your high-quality photos to be well-represented on Facebook. You can also download this guide if you’re a photographer concerned about Facebook’s (lack of) image quality.
Things to keep in mind:
QUALITY LIMITS
Some cloud backup services offer unlimited free storage, but only for photos that don’t go over a certain file-size limit. This means your “backup” is apples for apples. You have the files, but they aren’t the same high-resolution as your originals.
What does this mean? Say you had a JPG photo file that was from your 12 mega-pixel digital camera. Upload that to Facebook and the max you’ll have is 2048×2048 pixels, or 4.19 megapixels. Same goes for Google+. Twitter shrinks a shared photo down to 375×375 pixels or just 0.14 megapixels. And Instagram, the photo-loving site itself, only allows a maximum of 612×612 pixels, or 0.37 megapixels.
Maybe you’ve witnessed this compression phenomenon firsthand when you tried to download a photo or two off a friend’s Facebook timeline, only to find it was too tiny and poor quality for you to print it out or do anything else with it at all. There are a few solutions to working around this fact. One is offered by Facebook when you upload photos into albums at least. Choose the “high quality” option to limit compression. Other experts suggest making your file a PNG24 instead as those are not being compressed. One thing to consider is the higher-quality photo file will cause the page to load slower so keep that in mind and maybe only use it for certain specific photos.
UPLOAD TIME
One issue to consider with a cloud storage solution is the time it takes for your files to be uploaded via the internet. If you are using your home wi-fi to start a backup with a cloud site, it may freak you out how long the initial backup will take. It depends on how much data you have to backup of course, and the speed (or lack thereof) your ISP offers for uploads.
Typically the base level internet packages do not offer much for upload speeds as most of us are more worried about downloading data. But if you intend to do a major cloud backup, it might be worth asking your ISP for an upgraded plan that bumps your upload speeds to a higher level, at least until your initial backup is complete. After that, the incremental backups won’t take nearly as long!
One other way to speed up your uploads is to NOT use wi-fi but plug directly into your router via ethernet cable. This will ensure the highest possible speeds.
CLOUDS NEED INTERNET
One basic fact is that the cloud needs the internet. Without it, you can’t get to heaven, so to speak. Internet access connects you to the cloud. Most of us are pretty connected in today’s world but if you’ll be in a remote area with limited (or slow) internet access, access to cloud storage will be a challenge.
These days you can get online on planes, cruise ships, trains, vehicles, practically anywhere — so this isn’t usually a concern. However, if you are traveling and can’t access free wifi internet, you’ll be paying for service. When this happens, you typically do NOT want to use your expensive data plan for uploading photos. Save that for when you are on your own free (& protected) wi-fi.
What’s awesome about having your photos stored in the cloud is that they are accessible to you from any internet-enabled device. So you can show and share your pics with anyone right from your mobile device (phone or tablet) while you are away from home, visiting family, on vacation or anywhere on the planet.
 THE [KITCHEN] SYNC
Cloud storage isn’t the best unless it can sync, meaning update regularly. Say you upload your photos to your cloud provider. Then you go back and edit a few of those photos. You don’t want to risk losing your updates, do you? And you don’t want to manually go to upload the ones you edit each time back to the cloud. You want it to happen auto-magically! And that’s what syncing can do. It checks every so often (some intervals can be determined by you) to see if any files have been changed. If they have, it will upload the new version to the cloud for you. Done deal.
CLOUD CHOICES
I’m not going to delve into great detail over all the options available as this will become its own specific series at a later date. I will mention many of the choices out there and let you do your own research to decide your best solution. You may want to study their privacy policies, security protocols, sharing options, file types, and of course, storage limits.
Google Drive, Crashplan, and Dropbox are three of the heavy hitters for cloud storage. Best of all, these offer automatic uploading and syncing, which are a must-have when it comes to backing up photos. Unless you are the type who manually backs up photos daily. [I doubt those people exist. And if they do, they certainly aren’t reading my Spring Fling Digital Photo Organizing Challenge blog!]
Personally, I use the first two right now. I’ve only used Dropbox for “other” file types and sharing with colleagues but I know many people depend on it for photo storage too.
GOOGLE DRIVE
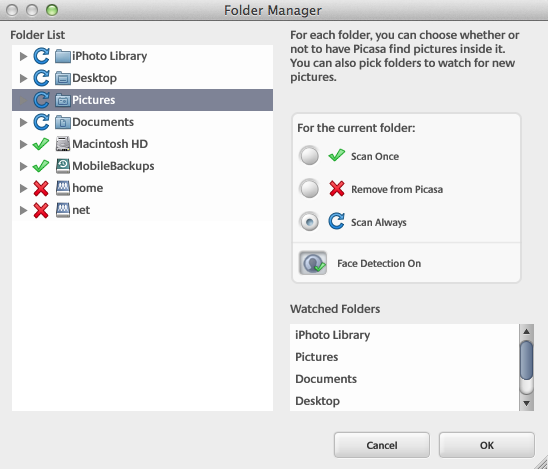
The giant among all things online is a pro at saving your stuff. Best of all, if you’ve been using Picasa like me to organize your photos, you are automatically linked to Google for a number of awesome features like Web Albums, backups, and so on. Now there is a whole lesson on Google+ and how that works with your photos but if nothing else, Google gives you a way to save your photos on its servers.
iCLOUD FROM APPLE
Signing up gets you 5GB of free storage with options to upgrade for an additional monthly fee. For example, you can pay $19.99/month for 1TB (terabyte) of storage in the U.S. and Canada. However, that number isn’t just for photos — it also includes Mail, Backup, iCloud Photo Library beta, and iCloud drive, as well as a few other apps that use iCloud to keep files up-to-date across devices. None of the media you’ve purchased counts against that storage though.
If you’re an Apple lover like me, you’ve heard of the recently released (in beta) iCloud Photo Library. The Camera Roll and My Photo Stream were merged into a single “All Photos” album on your device. Learn all about its features and functionality here.
AMAZON CLOUD DRIVE
Another giant in the online world, Amazon offers cloud storage (as well as actually operates cloud storage for the large majority of other cloud storage companies). They know the cloud because in many cases, they ARE the cloud!

A recent announcement was made that all can receive unlimited cloud photo storage as an added benefit. You had better be taking advantage of this as well as your free two-day shipping! It’s a no brainer! It has an app that makes mobile uploads (& viewing) a breeze.
The only hitch is that there’s a 5GB limit for videos (& other file types so if you take quite a few clips of action footage, you’ll reach the limit on that. Of course, you can always buy more storage if need be. Since this news came out, I made sure to take full advantage of this solution and am happy about it so far!
CRASHPLAN/BACKBLAZE
A true backup runs like Crashplan or Backblaze. You set it up and after the initial backup upload to their servers, all backups will be incremental — only updating/adding any new files or recently modified ones through syncing. The best part is that you can put these services on “auto-pilot” so you don’t really have to remember to backup. That said, I’d prefer you take matters into your own hands to consciously impact the youth.
TIME MACHINE BY APPLE
Time Machine is backup software through OSX by Apple. It automatically records to an external hard drive that you designate as your backup.
OTHER OPTIONS:
Shutterfly is the photo printing giant of the industry. Founded in 1999, this massive company owns several brands under its umbrella of photo-gift-related publishing. You can enjoy unlimited photo storage for free with no need to purchase to avoid deletion. One really cool feature of Shutterfly is its recent purchase of the This Life app for organizing photos via mobile, desktop and cloud. I’m a definite fan of this system and will be writing a detailed review in the coming months.
Snapfish is celebrating its 15th anniversary this year. Owned by printing/computing giant Hewlett-Packard, it still offers unlimited photo storage for free as long as you buy at least one thing — even if that’s one 9-cent photo print — per year.
Dropbox was designed as a file-sharing site — not necessarily a photo-specific site, although it has evolved into a solution that is often adequate for many users wishing to save their photos.
Flickr is an image-hosting site launched in 2004, but acquired by Yahoo in 2005. A new, much-improved user interface design came out about a year ago that brought back many of the fans who’d left. Giving everyone 1000GB of free space, Flickr’s generous storage policy makes it a favorite of photographers and photo fanatics alike.
SmugMug is a 13-year-old family-owned company that stores your photos online, and so much more. Its highlights include the gorgeous gallery sites you can create yourself to feature your photos. You can even opt to sell them should you choose the commerce options in its Business plan for $25/month. The cheapest Basic plan is just $3.34/mo, with a Power user at $5/mo and a Portfolio package for $12.50/mo.
Mylio is not necessarily a cloud hosting solution only. It’s a brand-new photo organizing option that definitely looks like an ideal choice for me. I’m only new to it so I can’t fully vouch for it but intend to “test” it extensively this year. Maybe I’ll be able to do a full review in a few months. I do know that it has the seal of approval from many top photographers in the industry so that should say something.
PictureLife, Trunx, Shoebox and Dropshots are all options with an app that I’ve been using for a while now. I’ll cover these at a later date.
In summary, know that the cloud should be part of your 3-2-1 Back-up Blast-off plan as it satisfies two of the three criteria — a non-physical copy that’s not physically present.
Tomorrow we’ll talk about sharing photos on social media sites such as Facebook, Instagram, Twitter and so on.


 Most of them simply plug in via USB to your computer, making it fairly simply to copy the files over. And should the need arise, you can easily restore your photos from that EHD backup to a new computer if that’s the case. (Congrats on the new hardware, by the way! I’m jelly! That’s jealous, for you non-hipster lingo peeps!)
 USB/THUMB DRIVES
 OPTICAL MEDIA OPTIONS
 THE GOLD STANDARD


 DATA CORRUPTION


 But you SHOULD print SOME (or all) of your STARS! If all else failed, and I mean your digital backups on hard drives, thumb drives, DVDs, and such, you’d still have printed copies of your most prized photos. And those can be scanned into digital files again if absolutely necessary. At that point, your slight quality degradation from losing an iteration of your image will be the least of your worries. If this sentence didn’t make much sense to you, that’s okay. It’s just pointing out the fact that a copy of a copy is never as nice as the original. If you’ve ever tried to photocopy a crappy photocopy, you know what I mean. It doesn’t get better, that’s for sure!
 I’m not going to analyze or advise on WHO/WHERE to get photo prints made, but I can tell you that the quality and service you’ll get from a local photo retailer (real store run by photo experts) will always outperform any online option or discount department store. You can Google side-by-side comparisons of quality (paper and color and clarity) for about any mainstream service on the market. You do want the colors to be true and sharp. And if the paper isn’t archival-quality, it won’t last as long as it should, defeating the point of having it as a backup to your backups. But if you aren’t prepared to handle the prints when they come into your home, you’ll soon be looking for blogs on how to organize prints. What’s that you say? You already have that problem too? No worries. I’ll be covering that soon but this is my primary concern — and should be yours too!


 DAY 10 — 15 MINUTES. LET’S GET PHYSICAL WITH OUR BACKUPS!

 WHOA WARNING
 TALKING TIME LIMITS


 If you’ve already done your STAR process to find your favorites (& you should’ve since that was


 TALKING TIME LIMITS


 MUG SHOTS


 TALKING TIME LIMITS
 Now just to clarify for you security-scaredy-cat folks, your photo metadata CANNOT really be read by Google or any other search engines. I’m merely pointing out that it works in a similar fashion to a search engine, but this searching is all done on your own computer to find your own photo files!
 People tend to prefer the word “tags” because it makes you think of price tags or gift tags that are attached to items and give you helpful information such as “This is THAT much?” or “That’s for me?”
 TAG, YOU’RE IT
 Before you start typing in text willy-nilly, think for a few minutes about the words you would use to jog your memory when you want to find a photo. Scroll through your photo collection in Picasa for visual cues to start making a list in your head. If you want, you can jot a few notes down on paper but the idea is to get your brain in the right frame of mind.


 INHERENT INFO


 TELLING A STORY “DOWN THE LINE”


 AN APPLE A DAY
 I DON’T DO WINDOWS
 YOUR FAVORITE STARS
 You may think you’d prefer to rank your photos on a numerical scale or a 1 to 5 stars so you can gauge them along a sliding scale. Other programs offer this option and it’s really your choice but for me, it’s an added level of decision complexity. Because if you really think about it, are you going to keep the photos that you would mark as 1s or even 2s? You shouldn’t! Just delete them right on the spot! I doubt you’ll miss them because you really don’t love them enough. It’s okay. They don’t mind.
 Now if you are just reading all of my how-to posts before you actually do any of them, I suppose you could TRY to combine both DELETE & STAR tasks into one step. Although I don’t believe you will work as fast because your brain will be trying to think on extreme opposite ends of the spectrum — finding the very best AND very worst. It might be more productive to give your full focus to either deleting the duds or starring the favorites.
 Think about it like this…you’re in an elevator and you want to show someone your favorite photos from this certain folder. You don’t have a lot of time. Which ones do you pick? Now it doesn’t have to be just 3 or even 10 if it’s a folder of 100 photos but it should be a significantly smaller percentage of the total. I don’t want to give you any hard, fast numbers to follow because it’s not about that. It’s about choosing the best photos you love and the ones that best represent an event or moment that you captured in your life. That’s what matters more.


 Sure, you can start printing all your digital pictures. But that leads to the former well-known definition of physical hoarding and clutter because now you’d have photo albums filling bookshelves and stuck under beds. Who are we trying to kid? If you printed all the digital photos you take, you’d probably have all those photo prints filling Amazon cardboard boxes because they never quite made it into photo albums, right? Hey, no judging, no shame.
 It’s the same concept for digital, minus the printing. You’d think you would need to duplicate, or copy, the image so it can go into two folders labeled for each child. But please don’t! This concept not only doubles your workload but it also can cut your hard drive space in half! Not a wise move on either side of the coin. I’ll give you alternative ways to assign that information to the one JPG. Think of it like a photo on Facebook that you tag with the names of everyone pictured and that data is saved along with the image so you can see it later. Or forever if we’re talking about Facebook, right?
 DIGITAL DILEMMA — “MISCELLANEOUS” IS NEVER A GOOD NAME
 DELETE THE DUDS & DUPLICATES
 Your mission today is to start from your most recent photo folders (and then work your way back in time). Open whatever photo viewer you like on your computer so you can see the image in full-size. Look quickly and make a gut instinct decision if it’s a great (or at least good if it’s the only one of its kind) photo. If you absolutely don’t like it (or need it preserved), please hit the DELETE key or trash it. And move on to the next.
 But what about a sunset photo that’s still just as awesome as the ones before or after it? It can be hard to narrow these down unless you are a pro with a trained eye and ruthless regard for reducing image count. If you can cull your choices down and the ones left still tell “the story,” you have enough. If you can’t tell the story of a sunset in fewer than 65 photos, you need help. Enlist a loved one or a good friend you trust to vote. However, you have to agree to let them delete the ones they didn’t choose as the very best. You can’t ask for their input and then veto it! Try to “let it go” and realize that these sunset photos are not as precious to you as ones of your loved ones. If you keep too many sunsets, you won’t have room for your kids or cats. Try to keep things in perspective, people.
 e if it’s not yet. I’m not saying you need to overly doctor your pics until they barely resemble the reality that was captured. That artistic effect has its time and place too. I’m suggesting you use editing to enhance and improve so-so photos into awesome photos. Or to save pretty-crappy pics that need help with exposure, red eye, cropping, color correction, saturation or other adjustments.
 TALKING TIME LIMITS
 “The devil is in the details” may be an odd phrase, but it’s supposed to warn you that overlooking the small things now can cause bigger problems later on. This is so true when we’re talking about organizing photos! Details are what we’re covering today so don’t skip this step.


 MARCH MADNESS


 2N = NAMING & NUMBERING
 02-TO-DO

